

Google Docs is all about collaboration – it makes the creation of written content very easy.
However, sometimes, even though you can review the change history in a document, you may want access to a more direct track change method.
If you’ve ever worked in Microsoft Word or similar text editing software, you’ll know about the Track Changes feature. For that reason, you’re probably looking for it in Google Docs.
You aren’t alone. There are a lot of people out there who are struggling to find the same option. The good news: There is an option to track changes in Google Docs.
Activating this feature is straightforward, so you don’t have to worry.
This article will provide you with a step-by-step walkthrough on how to track changes in Google Docs.
Effortlessly export your Google Docs to WordPress with just 1-click.
Get Started TodayThe Track Changes option is actually a Microsoft Word feature that allows you to make “suggestions” inside a Word document. Presumably, these suggestions will be later reviewed by someone else, who can either accept or decline them. This makes things quicker for the person reviewing the changes – instead of reading suggestions in brackets or in comments and then accepting/rejecting them, you can do it with the press of a button.
Track Changes is an essential review feature in text editor apps.
In Google Docs, however, this feature bears a different name — “Suggesting mode“, but it works pretty much the same as Track Changes in Word.
Let’s say that you’re writing a piece of official or semi-official text that’s going to be seen by a number of people. You’re probably going to have an editor or a proofreader. They read your writing and point out (add comments) what you should change. So, in order for them to see what parts of the text you’ve changed, you turn on Track Changes (the suggestion mode). Now, when they want to review the changes, they don’t have to sift through the entire text, just the marked changes that you’ve made.
Of course, the changes are marked automatically, so you don’t have to think about crossing out sentences and changing font colors for easier recognition. This streamlined process is beneficial not only in document editing but also in collaborative coding environments within a custom software development company.
Essentially, you want to make it easy to review the changes that you make inside a document. In this respect, Track Changes is the perfect feature for you. Here’s how to use it.
Prefer to watch a video tutorial?
As mentioned earlier, Google Docs doesn’t have the Track Changes option; at least it’s not called that. Google Docs refers to this mode as what it really is – a suggestion mode. So, you can quit looking for the “Tracking Changes” option right now.
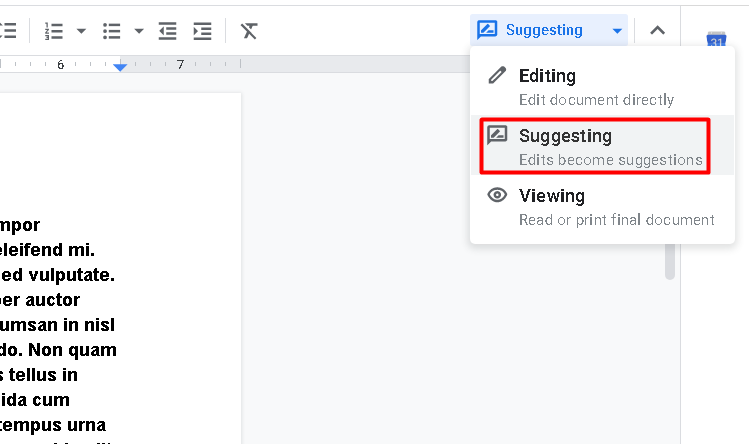
Inside your Google document, navigate to the upper-right corner of the screen. By default, it will say “Editing.” Click this menu, and you’ll see three options – Editing, Suggesting, and Viewing. Select the middle one. By accessing the Suggesting mode, you’ve successfully activated the Google Docs version of Track Changes.
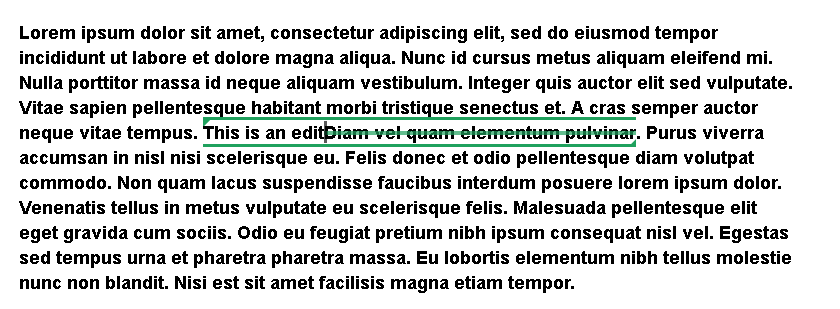
In Suggesting mode, as soon as you start making textual edits inside the document, they’re going to be tracked. Highlight a passage and write something else, it will then be turned into strikethrough text, and the color will change. The same goes for deleting the text. If you add text, it’s going to be highlighted in a different color.
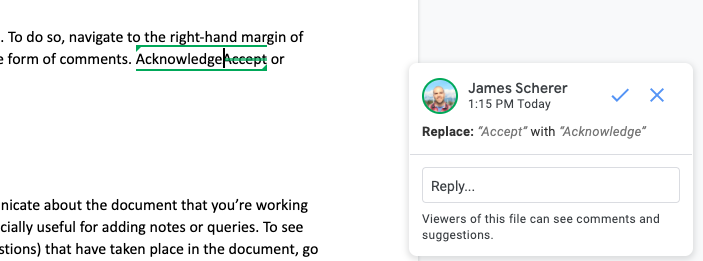
You can either accept or reject the suggestions. To do so, navigate to the right-hand margin of the document. You’ll see the suggestions in the form of comments. Accept or reject them.
Comments are one of the best ways to communicate about the document that you’re working on with other people. This feature can be especially useful for adding notes or queries. To see all comments and discussions (including suggestions) that have taken place in the document, go to the upper-right corner of the Google document page and click the text chat icon (Open comment history). Alternatively, use the Ctrl+Alt+Shift+A shortcut.
Inside the previously mentioned comment history, you’ll be able to see all textual interactions (comments, suggestions), including the resolved/deleted ones. You’ll also be able to see the resolved comments here as well.
The Viewing mode is the third and final option for reviewing a Google document. This mode doesn’t allow you to make any edits inside the text. It also doesn’t allow you to see the comments or change them in any way. The Editing and Suggesting modes, though, enable you to read the comments, delete them, edit them (if you’ve made them), as well as accept or reject them.
You can’t. But what you can do is add comment-only access to a collaborator. Simply navigate to the Share option (upper-right corner). Now, add the contact that you want and select “Commenter” in the drop-down menu to the left. Click Send. This person can now comment and view your Google document.
To hide all the edits (comments, suggestions) in Google Docs, go to File, and hover over the Version history entry in the drop-down list. Then, click See version history and move the slider to the Only show named versions option. This will hide all the unnamed stored versions.
We hope that this article has given you all the necessary information to track changes in Google Docs. Follow the step-by-step guide carefully, and you’ll be able to do exactly what the Track Changes option allows you to do in Microsoft Word.
To all intents and purposes, the Track Changes feature in Word, and the Suggesting mode in a Google Docs file, share the same capabilities. They’re just activated in a different way.