

When you are working on a multi-page document in Google Docs, adding a header and footer can be incredibly important. You might need to use the header to add a description to your document.
Or perhaps incorporate the document’s name, revision number, or a graphic. There are many options available when it comes to a heading style. But if you haven’t had any experience with it before, it might be a little confusing how to edit a header in Google Docs.
People who have previously only used Microsoft Word might find navigating through the Google Docs header and footer options unusual at first. But the truth is that editing header text in the Google Docs app is as straightforward as can be.
In this article, we’ll talk about how to edit the top margin of a page in Google Docs, also known as a header. Plus, we’ll also explain how to edit the bottom margin of the page, known as the footer.
Effortlessly export your Google Docs to WordPress with just 1-click.
Get Started TodayIf you’re writing a business letter, for example, your header will likely go on the second page of the document you’re working on in Google Docs. On the other hand, writing a newsletter will probably need a header on the document’s first page.
The document outline will dictate where you’ll add the header and if you’ll need to add a footer that might contain the page count and other relevant details. So, when you need to add and edit a header in Google Docs, this is what you do:
Firstly, open the document you wish to edit with Google Docs. It doesn’t matter if you are creating a new document and adding text on a blank page or if you’re using an existing document. Log in to your Google account and open the document you want to edit.
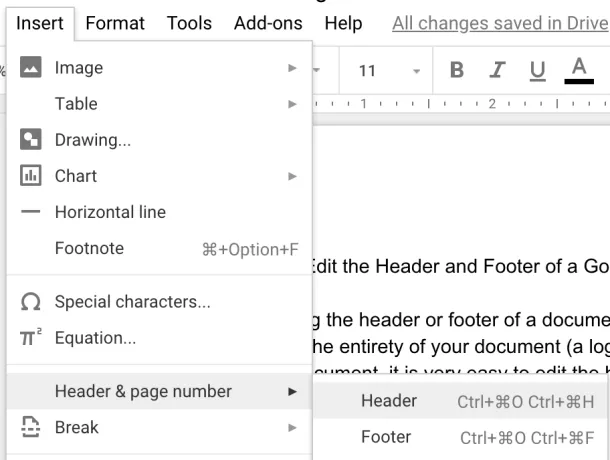
The next thing to do is navigate to the “Insert” menu on the Google Docs toolbar. From the dropdown menu, select the “Header & page number” option.
The menu will extend further, and from there, you’ll be able to choose the “Header” or “Footer” option. Click on “Header,” and you’ll immediately see that your cursor has moved to the header section of your document. You can type your text or add a graphic from there.
When you add a header on a page in Google Docs, by default, it will appear in all subsequent pages in the entire document. This is a practical application of this feature if you need to have a logo present on every page. But in many instances, it’s not necessary.
This used to be impossible to change. But Google Docs recently allowed you to opt-out of that. So, when you insert a header for the first time, you’ll see an option just underneath that says, “Different first page.” If you only want to leave the header on that page, check the box next to this option.

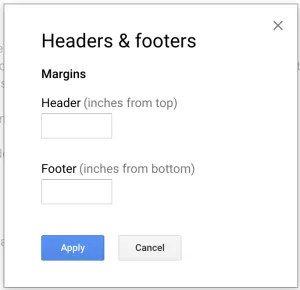
Next to the “Different first page” feature, you can also select “Options” to change the header margin size if you need to. You can also choose if you want to apply this change to the whole document or only that particular section. Make sure to click “Apply” to save your changes.
Finally, if you want to have a different header and footer for each page of your document, you need to create a section break for every page. To do that, make sure to place the cursor at the very end of the page and then follow this path “Insert>Break>Section Break (next page).”
The cursor will then move to the next page. You then have to click on the header and uncheck the box that says, “Link to Previous.” This will ensure that each header is entirely independent.
If you’ve changed your mind and don’t need a header anymore, you can easily remove it. All you have to do is double click on the header or footer, and on the right, select “Options.”
From there, just select “Remove header” or “Remove footer.” That’s it. If you want to remove the margin space after you remove the header, change the header’s margin size and footer to zero.
If you’re dealing with a massive document with complex formatting, it’s essential to know all the ins and outs of Google Docs features. If all you need to do is add one header and one footer to a document, that’s really easy.
Or if you need one header to repeat on every page. But when a project requires separate headers, that takes a little bit more effort. Still, Google Docs makes adding and editing the header and footer relatively straightforward.