

Has your boss asked you to create a hanging indent in a Google Docs document, but you don’t know where to start? You may not even be sure about the difference between a hanging indent and a regular indent.
Don’t worry. You’re not alone. Most people don’t know what a hanging indent is. If you’re not an academic researcher, you probably don’t have to use it, and no one expects you to be familiar with it.
That said, it would be best if you learned how and when to use it, as it’s really simple and can make your work look more professional. Moreover, this skill could impress your business partners or a potential employer.
In this article, we’ll show you how to create a hanging indent on Google Docs. Moreover, we’ll explain when it’s appropriate to use it and what are the common mistakes involved.
Effortlessly export your Google Docs to WordPress with just 1-click.
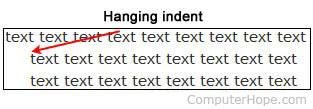
Get Started TodayThere are various types of indentation, and this may not be the most common. In fact, a hanging indent on Google Docs might be precisely the opposite of what you expect to see when you hear the word “indent.” That’s why people sometimes also call it a negative indent.
The ordinary indent means that the first line is set to right, while every following line returns to the left margin. In this case, however, only the first line will be near the left margin, while the rest of the paragraph will be set to right.
If you ever had to write a paper, you’ve probably come across this feature, but maybe you didn’t understand why it was used. The hanging indent is often found in academic writing and school papers. It’s usually used for sections like a bibliography, references, or a list of works cited.
Some of the major writing styles, such as MLA, APA, and CMS, require using hanging indents when needed. However, some companies may require their employees to use this style when writing reports. In any case, it’s good to know how to use it, as you may need it at one point.
Creating a hanging indent is an easy thing, although it may seem like there’s a lot to do. Once you go through the entire process for the first time, everything will look more natural. People are usually required to indent a single paragraph, but you can indent more paragraphs or even the whole document.
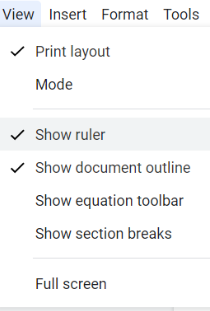
Before you start, check whether you can see the ruler: it should be at the top of your document. If it’s not visible, you may need to turn it on before we can start. Here’s how:
That’s it! This is an essential step as you can’t make a hanging indent without the ruler. You’re now ready to follow the main guide:

If you don’t have any special requirements, you can position the small blue triangle wherever suitable. However, if you’re following a particular writing style, you have to be extra-careful and place the triangle accordingly. The good news is that you can zoom in on the ruler if you can’t see the numbers clearly.
It’s essential not to try to move the margin as well. This can be challenging, as everything’s in such close proximity. However, even if the margin moves as well, there’s a quick way to fix it. We suggest you reverse everything by clicking on Edit and then selecting Undo. You can now try again, just be more careful about the margin this time.
Moreover, make sure to return the margin control back to where it was at the beginning.
The standard indent can be anywhere from one-quarter to one-half of an inch. If you have to follow a particular writing style, it can be a good idea to check whether it has any special requirements when it comes to a hanging indent.
Some people prefer to call a hanging indent a negative indent because it represents the opposite of the regular indent we’re used to. Therefore, if you ever come across this term, you can be sure that it’s actually the same thing.
The indent button is located at the end of the horizontal ruler. It looks like a small blue triangle. If you can’t see it, you may need to activate the ruler first. You can do so by selecting the option Show Ruler.

When it comes to Google Slides, the process is a bit more complicated, as there’s no hanging indent option. You’ll first have to indent the whole text and then return the first line back to where it originally was. The final result will look like a real hanging indent.
Yes. If you’re using the MLA writing style, you have to format every reference with a hanging indent. The standard format for a hanging indent, according to the Modern Language Association, is 0.5 inches, but we suggest you check whether there are any special requirements for your project.
Hopefully, you now have a better understanding of what a hanging indent is and when should you use it. It might take a while to get used to creating it precisely, without moving the ruler too much. However, it’s absolutely worth it as you never know when you might need it.
The hanging indent is no longer reserved just for academic research, as some companies now ask their employees to use it in their reports. After all, it can make your lists look far more professional.