

When writing a document, it’s not enough to just get your thoughts down on “paper.” There are all those spelling and grammar conventions you need to keep in check as well. If this is something you’re struggling with, you’re not alone.
Even the most seasoned writers make these kinds of errors all the time. And this is where a spell check option saves the day.
Spell check automatically recognizes any spelling or grammar errors you may have in your text and suggests suitable corrections. You can even enable the “Auto Correct” option to address any spelling mistakes you might make.
In this article, you’ll learn how to turn on spell check in Google Docs, as well as how to customize autocorrect options to work for you.
Effortlessly export your Google Docs to WordPress with just 1-click.
Get Started TodaySimilar to Microsoft Word, the spell check option in Google Docs automatically checks your entire document for errors. If there’s a spelling or grammar error, each one will highlight in your text and the spell check will suggest how to correct any of these.
Spell check is a useful tool you should never disregard, especially when trying to learn English grammar effectively. It helps you create a properly written text, clearly conveying your message to the reader without any unnecessary distractions.
Although you can decide to never use spell check, it’s absolutely certain you’ll make at least one spelling mistake in your document. Catching these mistakes by reading through your Google doc is both time consuming and unreliable.
Just think of writing an email asking your manager for a promotion. You want them to focus on all the good things you did in the past year and why you deserve this. You don’t want them to get lost in the maze of spelling and grammar errors. After all, writing that email is a business undertaking as well.
In order to get rid of any errors you might make when writing something with Google Docs, it’s imperative to do an automatic spell check. Whether you’re using Google Docs on your computer or a mobile device, this section will show you how to spell check properly.
Before you start, it’s important to set your proofing language. This way, you’ll allow Google to recognize the words you’ve misspelled and correct any grammar errors it may find. To set the language, follow these steps:
1. Click the “File” tab from the top menu.
2. Click “Language.”
3. Select the one you prefer and close the menu.
4. Now that Google knows which language to work with, it’s time to use the spell check.
5. Open your Google doc you want to spell check.
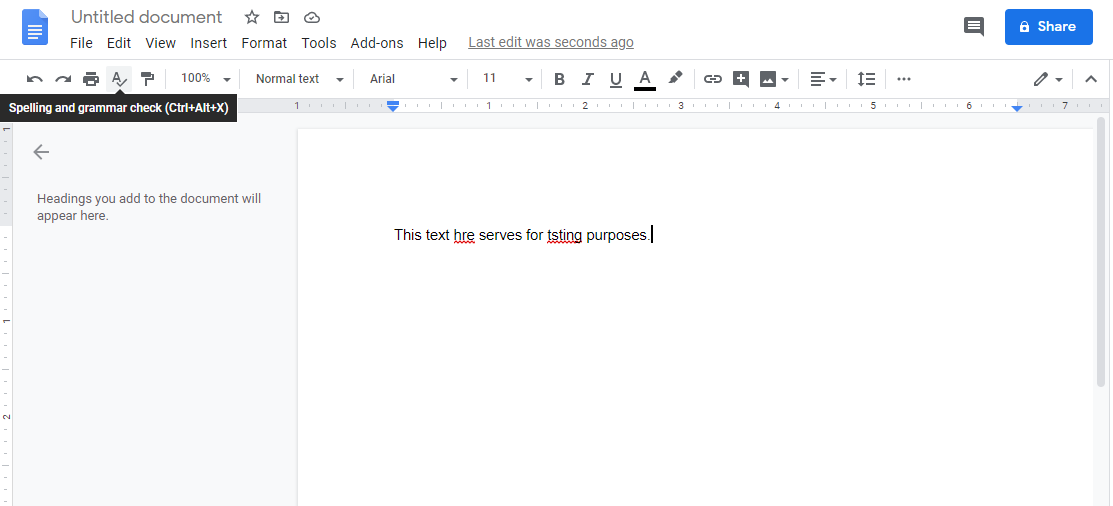
6. Click the “Spelling and grammar check” icon from the options bar in the top left corner. It’s the one that looks like a capital letter “A” with a check mark next to it.
7. Now you’ll see the spell check menu on the right side of the screen. If there are any errors in your text, you’ll find them here, as well as suggestions on how to correct them.
8. If you want to apply a suggested correction, click “Accept.”
9. If you want to leave it as it is, click “Ignore.”

Of course, there might be more than one typing or grammar error in your text. To apply the action to all errors, click the “More” button in the spell check screen. It’s the three dots icon next to the “Accept” button. When you click it, you’ll be able to choose whether to “Accept all” or “Ignore all.”
1. If you haven’t yet installed the Google Docs mobile app, you can find it on Google Play.
2. Open a text document in the Google Docs app on your phone.
3. Tap the “Edit” icon (the pencil).
4. Tap “More” in the top right corner (the three dots icon).
5. Tap “Spellcheck.”
If there are any errors, you’ll see suggestions on how to correct them.
6. Tap “Accept” to apply the correction.
7. If you want to ignore it, simply tap “Ignore.”
8. To apply the suggested changes to all errors, tap “More” from the top right corner.
9. Here you can choose to either “Accept all” or “Ignore all.”
Unfortunately, the iOS version of the Google Docs mobile app doesn’t provide this feature. In order to spell check your text, go to docs.google.com using a web browser on your computer.
The common reason why the spell check option isn’t working in Google Docs is the language you’ve chosen. Although Google has a large database of spellcheck languages, it still doesn’t cover every single one that exists. To see the available options, go to “File” and click “Languages.” Here you’ll see the entire list of the languages you can spell check.
If you don’t want to click around the screen to do a spell check every time you need it, you can use a keyboard shortcut. It’s the combination of three buttons: Ctrl + Alt + X.
Yes, there is. You don’t have to use the spell check option to correct any errors you make. Instead, Google will automatically highlight the words you misspell. To correct it, simply right-click the word and choose one of the suggestions from the menu.
Autocorrect is active in Google Docs by default. If you want to turn it off, click “Tools” from the top menu and select “Preferences.” In the “General” tab, uncheck any of the options you don’t want to use. In the “Substitutions” tab, uncheck “Automatic substitution” to prevent any auto-correction in your doc. You can also uncheck individual autocorrect options using the table below.
There’s no need to turn on spell checking manually since Google Docs automatically tracks your writing as you type. Most of the time, Google will automatically detect which language you’re using and it will apply the proper proofing tool. If you notice that the spell check isn’t catching the errors properly, you should check which language is currently active. If necessary, you can switch to another one. To learn how to do that, consult the “Desktop computers and laptops” subsection of the “How to Spell Check in Google Docs” section of this article.
Hopefully, this article helped you learn how to turn on spell check in Google Docs. Now that you know how to use this option, you can fully focus on writing the best text you can. Without trying to catch every single spelling error yourself, you’ll also save a significant amount of time. To the same end, familiarize yourself with using the keyboard shortcut to call up the spell check menu.