

When writing any document, besides crafting well-structured sentences, it’s crucial the writing is error-free. But now and then, a spelling mistake will appear in your document. It could be harmless, or it could affect your credibility.
Don’t worry. You’re not alone. Almost everybody who uses a Google Doc makes at least one spelling or grammar error. But does that mean you need to use expensive software to check your document for mistakes? Fortunately, not.
Besides being useful as a writing platform, Google Docs is also a grammar checker and can correct spelling.
In this guide, you’ll learn how to use the Google Docs spell check option to improve your writing and produce an error-free document.
Effortlessly export your Google Docs to WordPress with just 1-click.
Get Started TodayThere are three methods to ensure each word you write is without a grammar or spelling error. The first is using the spell check function. The second option is checking spelling word by word.
Both are equally efficient, it’s only a matter of preference. Finally, it’s also possible to use a keyboard shortcut.
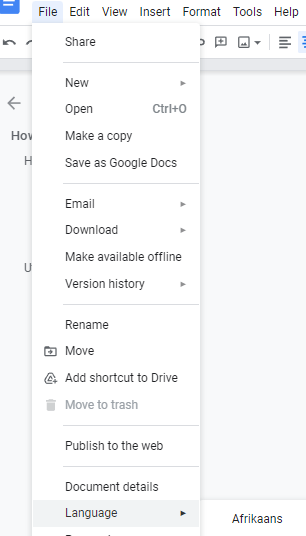
The first step in checking the spelling and grammar in a document is to enable the spell check function. This entails selecting the proofreading language:
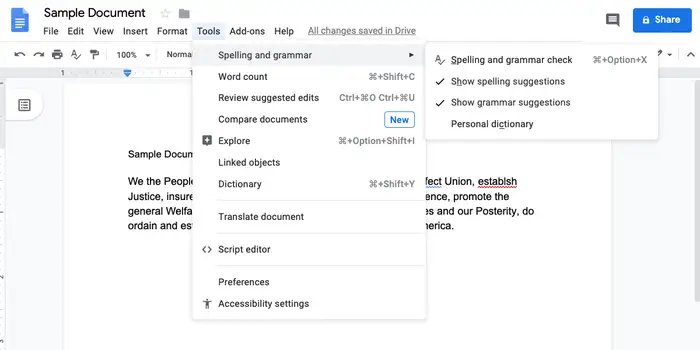
Now that you’ve selected the language, it’s time to learn how to use the spell check function:
Remember, if there are a number of spelling or grammar mistakes in your document and you want to accept them all, you’ll have to click the “Accept” button multiple times.
A neat function of the spell check is adding words you often use. If Google Docs previously recognized them as mistakes, once you add them to the document vocabulary, there won’t be similar issues. Here’s how to do it:
You can use this option for some technical terms or proper nouns, which Google Docs might otherwise see as errors.
Did you know there’s a keyboard shortcut for the spell check? You don’t need to tap on the spell check icon every time you want to scan the document for grammar mistakes. Holding “Ctrl,” “Alt,” and “X” simultaneously will open the same menu.
And if you’re a Mac user, pressing “⌘,” “Alt,” and “X” will do the trick.
Besides using the spell check function, it’s possible to check the spelling word by word. For some, this is a more useful option as it allows you to correct the mistakes as you go through your document. Here’s how to use it:
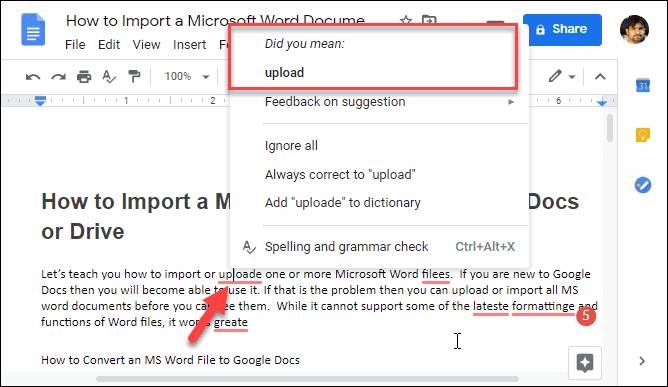
The great thing about this spell check function is that it enables users to offer feedback. Let’s say the document recognizes a mistake. However, you know you’ve used the correct term. Google Docs users can right-click on the word, choose “Feedback,” and select either of three options.
For example, if the suggestion isn’t correct, tap on “Suggestion is wrong.” If it’s unclear, click “Suggestion is unclear.” Finally, if you want to give more details, tap on “Provide more info.”
Such a spell check function ensures all grammar or spelling suggestions are correct and helps you create a document without errors.
As you can see, it’s possible to create a document without any grammar or spelling mistakes. Hopefully, you now know how to use the spell check function and the word-by-word option to correct possible errors and improve your writing.
On top of that, if you’re in a hurry, utilize the keyboard shortcut we’ve mentioned. But remember, before checking the document for errors, make sure to set the proofreading language.
With these methods, you’ll easily spot any error quickly and craft trustworthy documents.