
Adding a text box in Google Docs may seem simple. That’s likely only because you’re used to adding one in Microsoft Word or another word processor.
When the time comes to insert a text box in a Google Doc, you might draw a blank.
That’s because inserting a text box in Google Docs isn’t easy.
While the document function of the Google Suite offers revolutionary shared editing features, it’s still missing key functions.
Sadly, a text box icon in the menu bar is one.
Additionally, it’s missing the ability to add a text box within a document.
Fortunately, there are a few ways to work around this oversight.
Before we dive into how to insert a text box into your Google Doc, let’s take a look at why writers are doing it.
Effortlessly export your Google Docs to WordPress with just 1-click.
Get Started Today
Sometimes, writers want to present information in a certain way. In many instances, formatting in a Google sheet can be difficult.
That’s why many writers try to insert a text box to control how their content looks on a page.
Unfortunately, there’s no insert text box option that exists.
Writers have many uses for text boxes. Some popular ones include:
To put it simply: text boxes make a Google Doc, spreadsheet, or a Google Slide easier to digest, read, edit, and understand.
Let’s look at the steps you’ll need to take to add a Google Doc text box into your document.
There are two main ways to add a text box. Writers can use the draw function or the table function to insert a text box into their document.
Here are the step-by-step instructions for both.
Currently, the drawing option is one of the most popular ways to add a text box in Google Docs. Here’s how you can add one using the drawing function:
1. Choose “Insert” on the menu bar at the top of your Google Doc. Choose “Drawing,” and then “New.”
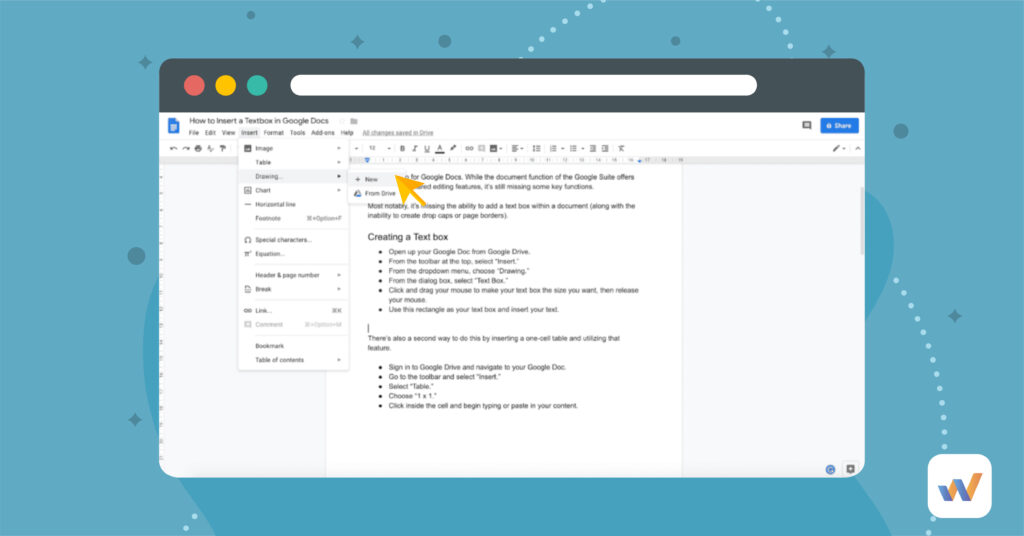
2. Choose “Text Box” on the dialog box. Type in the text you want and choose your alignment preference.

3. Adjust the size of the text box to your wanted dimensions. Press “Save and Close.”
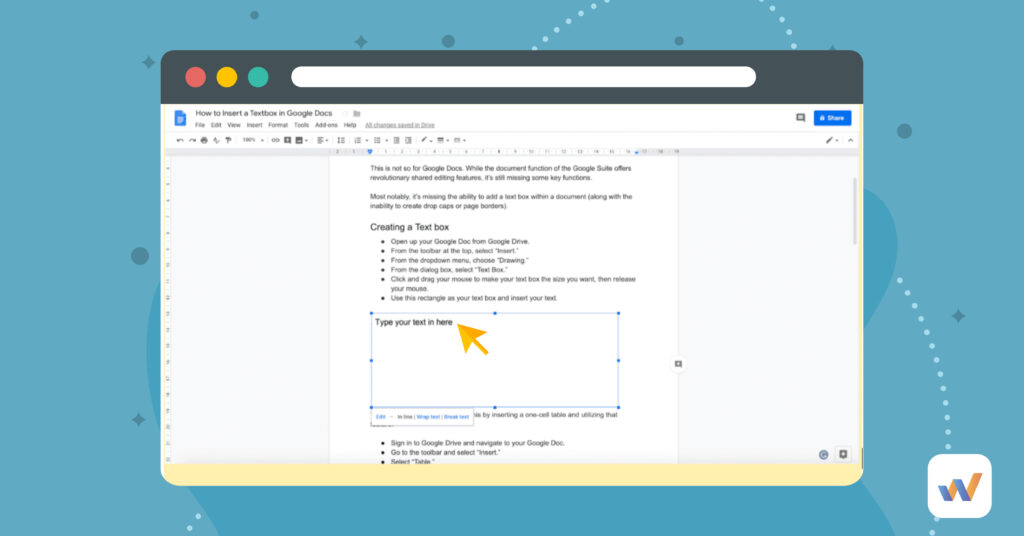
Use this rectangle as your text box and begin typing. You’ve successfully added a text box to your document!
Want to make it even simpler? Let’s look at another option.
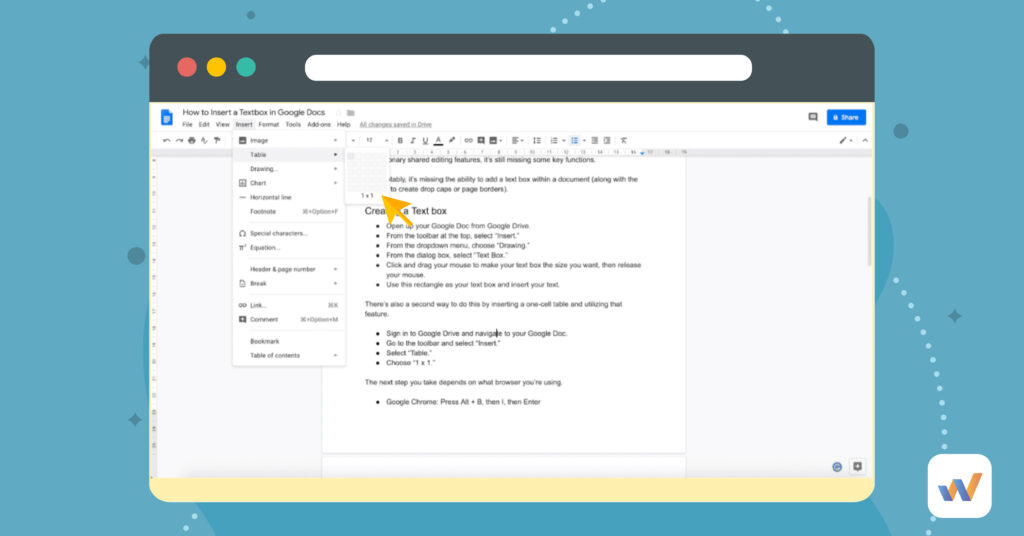
There’s also a second way to add a text box into a Google Doc.
Writers can do so by putting in a one-cell table. This might be a bit more simple for those that are looking for a quick and easy solution.
1. Go to the menu bar and choose “Insert.”
2. Choose “Table.” and choose “1 x 1.”
3. Click inside the cell and begin typing or paste in your content.
You’re all set and can format as needed.
Formatting is one of the main reasons why writers look to add text boxes into their documents.
Let’s take a look at how you can improve formatting in your document once you have a text box on your sheet.
1. Double click on the drawing tool and choose your text box.
2. Choose a formatting command and apply it to the text box. The formatting command toolbar includes standard styles like bold, italics, and underline options.
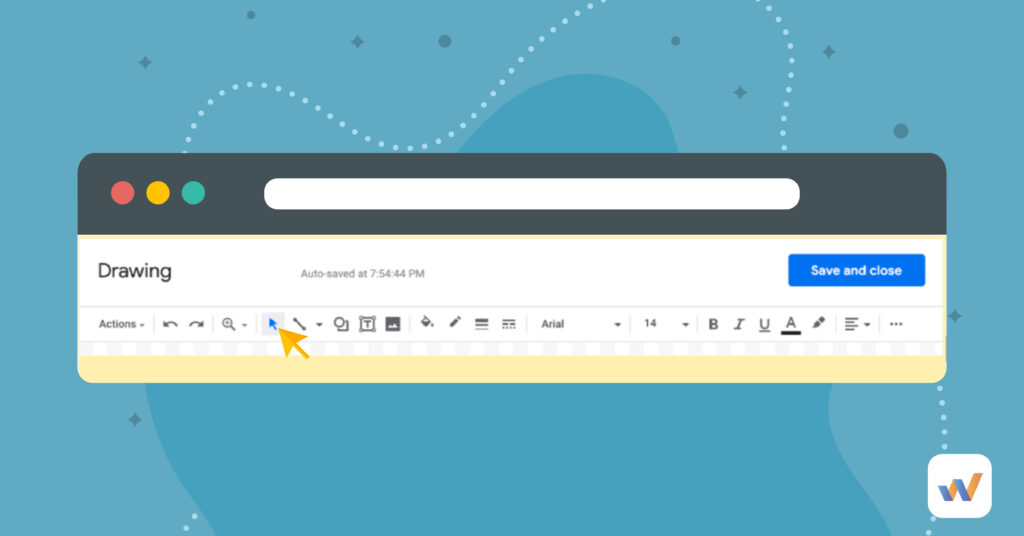
3. Hit “Save and close.”
Your text box should now be formatted, and all the copy inside of it should match the formatting criteria you’ve selected.
If you wanted to add a background color to your text box, take the following steps:
1. Choose your textbox and choose the “Fill Color” option highlighted in the toolbar. This is the tipping paint can icon.

2. From the drop-down menu, choose the color you want for your text box background. Once chosen, your text box background should now show your chosen color.
3. Click “Save and Close.”
Your text box within the document should be modified.
Perhaps you want to change how the box looks on your page. The two most common ways to do so are resizing or moving the text box.
Both are simple and intuitive.
To resize a text box, click the corner of the textbox and drag diagonally upward or downward.
To relocate a text box, click inside your textbox and drag the box to the desired location.
These easy formatting options can make your text easier to read and comprehend.
The border is one of the most important parts of the text box. It can appear in different styles, weights, and colors.
To adjust the border, choose the text box and click:
Simple variations of the text box border can help guide readers’ eyes to where they need to go.
Most of the style functions inside the text box are consistent with the same ones used on text in other places throughout the Google Doc.
To wrap the text, all you need to do is choose the textbox and choose “Wrap Text” or “In Line.” If you want to insert a break, choose “Break text.”
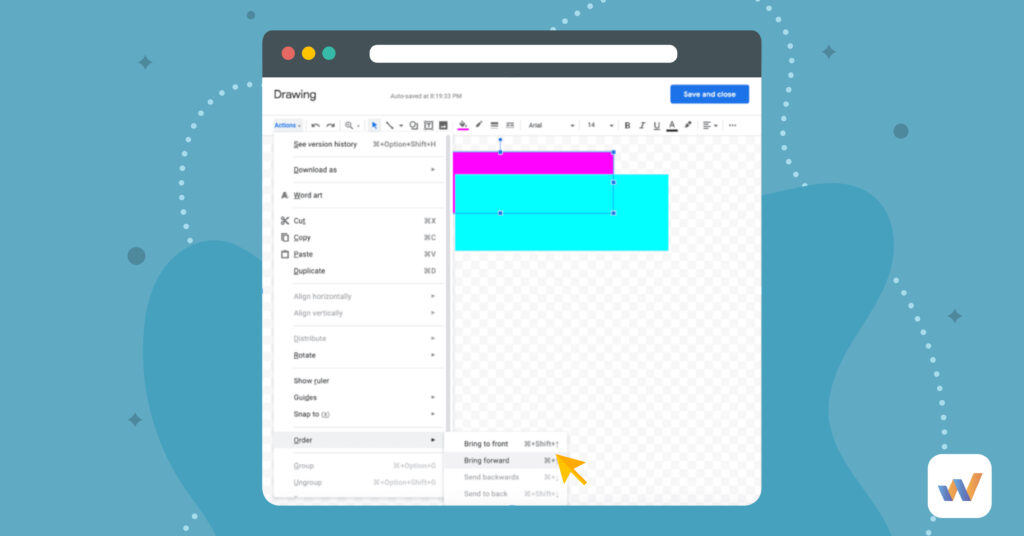
Sometimes, writers will need to show associations between different texts. That’s where layering comes in.
If you want to layer multiple text boxes over each other, do the following:
1. Go to the Google Drawing Dialog box. Choose the textbox you want to move forward or backward.
2. Choose “Actions” in the upper left-hand corner.
3. Choose “Order” from the drop-down menu. From there, you can pick “Bring forward” or “Send backward,” depending on what action you want to perform.
Layering is a good skill to know, because it makes it easier to manipulate a text box and move it around a page.
Text boxes in Google Docs are a common feature that writers often add throughout their documents.
But, the process of adding them can be a bit tricky.
Writers who know how to successfully implement one will be able to craft engaging articles that delight and engage their readers.
Once you’ve mastered the skills outlined above, you’ll be able to create text boxes in Google Docs with ease.
If you want to further master Google Docs for blogging, read this guide.