

If you write a lot, your wrists, brain, and keyboard will thank you for mastering Google Docs’ voice typing feature. It turns your voice into text, allowing you to draft blog posts, copy, customer tickets, and meeting notes without having to type on the keyboard.
If you work in marketing, you likely spend a lot of time thinking and brainstorming. And sometimes, talking out loud helps you write faster or spot flow mistakes in your copy, which can be challenging when you’re just writing or reading.
That’s where Google Docs voice typing comes in for people like us. It won’t replace your keyboard, but it can reduce the time from thinking to writing.
In this guide, you’ll learn exactly how to set it up. We’ll cover core voice commands, how to fix errors, boosting accuracy, and plugging voice-to-text into daily marketing workflows. And if you have an accent or use a dialect—don’t worry, we’ll cover that too.
Google Docs voice typing is an automatic speech recognition feature that turns your voice into text directly inside a document.
You click the on-screen microphone icon, speak, and the tool writes while you talk. It also understands many voice commands, like “period,” “new line,” “select paragraph,” and simple formatting.
In short, it’s a fast voice-to-text tool for drafting, taking notes, outlining, and making quick edits directly inside Google Docs.

Officially, Google Docs voice typing is designed for Google Chrome on desktop. You’ll find it in Tools → Voice typing in Docs.
There’s also a separate dictate in the Slides speaker notes feature for presentations.
It’s not natively available across every Google editor (such as Google Sheets) and is not fully supported in every browser.
Pros include:
Cons include:
Hardware and environment largely determine your accuracy before you even speak a word.
You might get away with a less-than-ideal setup if you have a standard American accent, but not if you have a British, Australian, or Mediterranean accent.
A 2024 study published in JASA Express Letters, evaluating OpenAI’s Whisper speech recognition, found that native American English accents tended to score higher in accuracy than other accents.
This means that clean audio and a good setup can be your best equalizers, and they are far easier to achieve than learning to speak with a new accent.
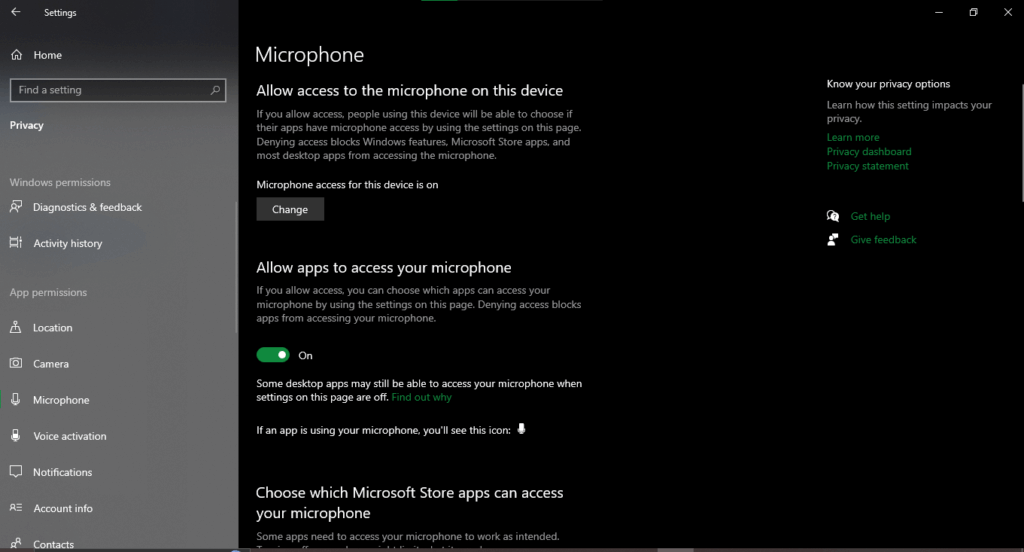
You need two green lights before voice dictation will work inside Google Docs.
A) OS permissions
Screenshot provided by the author
Make sure your target microphone is not disabled and connected properly. You might need to, for example, enable your mic from the settings to access its properties on Windows. In this case, go to Settings → Sound → Manage sound devices.

Screenshot provided by the author
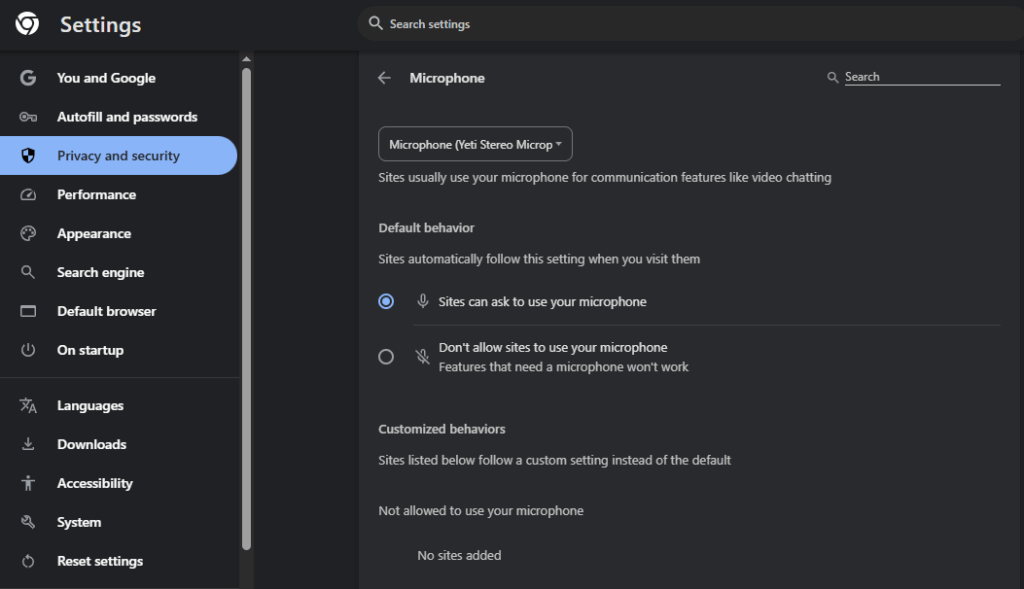
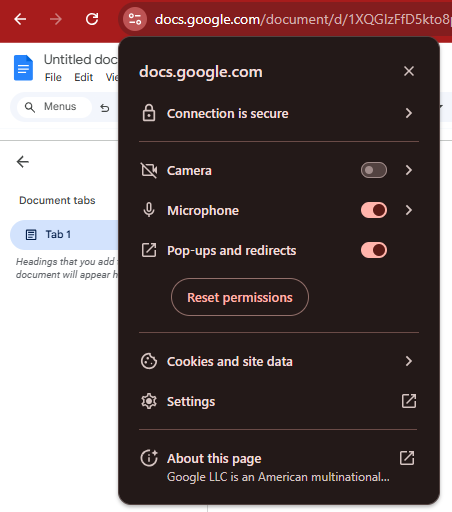
B) Browser permissions (Google Chrome)
Open Chrome Settings → Privacy and security → Site settings → Microphone.
Screenshot taken by the author
Screenshot taken by the author
Before you start Google Docs voice typing, let’s do a 60-second microphone test. This prevents “why is it missing words?” later.
Open any free recording app on your computer, such as Microsoft Recorder or Audacity. Hit record and say something like, “I’m going to start a WordPress blog in 2025 with Google Docs voice typing.”
Next, plug in your headphones and listen to the recording.
Is it clear? Is it too soft or loud? Is there an echo? Try adjusting the microphone volume and moving closer or further away from the mic. If you hear a lot of booming (especially with words that contain “p” and “b”, like “blog”), try installing a cheap pop filter.
If there’s a lot of echo and the sound isn’t clear, make sure you switch to an external microphone and set it as the default option in your OS and browser.
These tests might seem too simple, but this is what can boost speech recognition more than anything else.
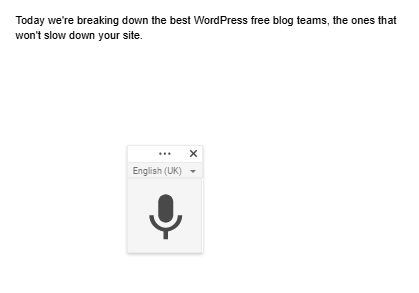
Now the fun part: dictating inside the Doc.
Example (blog intro): “Today we’re breaking down the best free WordPress blog themes comma the ones that won’t slow down your site period.”
Google Docs will transcribe and insert punctuation as you speak. If the mic turns gray or nothing appears, re-check microphone permission in the browser and OS (Step 2), then click the mic again.
Screenshot taken by the author
As you can see, it’s not perfect and sometimes it does make mistakes, such as writing “teams” instead of “themes”.
You don’t need a giant voice commands list. Memorize a handful:

Screenshot taken by the author
Example (editing a paragraph): “Go to end of line. Add laughing emoji.”
Google’s help docs list many more action phrases you can use as needed.
Dictation will miss things. The trick is correcting it without breaking your flow:
Example (editing a paragraph): “Select last line. Delete. New line. This theme loads in under two seconds period.”
You’ll get more done if you combine voice typing with a few Docs features.
A) Substitutions (auto-replace)
Docs can auto-expand shortcuts if you set up substitutions. For example, typing “;cta” becomes your full call to action.
See Tools → Preferences → Substitutions.
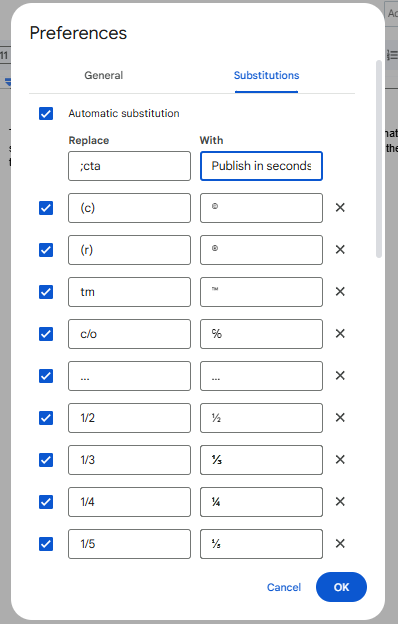
Screenshot taken by the author
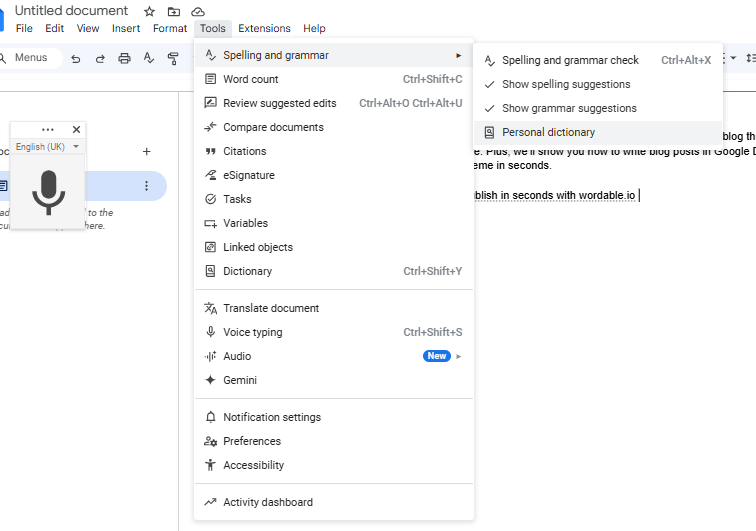
B) Personal dictionary
Add jargon or product names to your Personal dictionary so that voice recognition can learn them. In Docs: Tools → Spelling and grammar → Personal dictionary.
Example (SaaS terms): Add “freemium,” “LTV,” “MRR,” and your brand names to the personal dictionary once. Next time, voice dictation won’t guess.
This is a simple way to leverage branded content production.
Screenshot provided by the author
C) Accessibility: Screen reader support
If anyone on your team uses a screen reader, enable this in Docs: Tools → Accessibility → Turn on screen reader support. It exposes extra verbal cues and shortcuts.
You can also use Docs’ text-to-speech for readbacks. Go to Tools → Audio → Listen to this tab.

Screenshot provided by the author
If your company has a disability officer, assistive technology officer, learning support officer, or educational needs coordinator, loop them in early. They can standardize headsets, develop a one-page standard operating protocol, and procure braille hardware to support inclusive workflows.
Don’t forget to do the same for your customers by optimizing your web content for voice search. Not only does it help with accessibility, but it can also increase conversions on voice devices like Amazon Alexa.
Chrome’s internal voice typing feature is not for everyone.
Maybe you’re a Firefox loyalist, or you need higher accuracy for varied accents. Here are legit paths marketers use today:
This is the voice dictation or speech recognition offered by your OS.
On Windows 10 or 11, you can just hit Win+H (that’s the Windows key + the letter H) and dictation starts automatically. If you’re in Google Docs, anything you say will be written.
Most OS dictations today are pretty vast, supporting automatic punctuation, emoji commands, and special system commands.
A huge upside with OS dictation is that it usually works well across apps and system commands via speech recognition.
You can use it as part of your content repurposing strategy when moving between apps like social media and blog sites, and even paraphrasing your brand’s materials with AI.
If you can use Chrome (or a Chromium browser), Voice In gives robust voice-to-text in 50+ languages across 10k+ websites. This includes Gmail, some customer relationship management software, customer service portals, and chats.
It’s great when you’re bouncing between Docs, customer tickets, and web apps all day.
Here are two solid options that use Whisper:
If you have a strong accent or want to go all the way optimizing your performance with voice, try a dedicated dictation tool:
A recent study by the University of Edinburgh found that 20% of dictation word errors are because most models are trained on US accents. Hopefully, this study will encourage updates in popular dictation apps so they can be successfully used by everyone.
There are numerous web apps that offer dictation. One of them is dictation.io. This works in your browser. You can dictate in its editor and then copy and paste to Google Docs.
You don’t need to overhaul your world. Just slot voice typing where it unlocks speed, and reduces repetitive strain injuries at the same time.
A) Outline first drafts
Open a Doc and draft your H2s/H3s. Talk through your angle in plain language. In 10 minutes, you’ll have a messy draft you can refine.
When it’s edited and publish-ready, move it from Google Docs to WordPress with Wordable’s 1-click workflow to avoid copy-paste formatting purgatory.
That’s content optimization at scale.

B) Customer conversations to insights
When you hop off a sales call, dictate key objections, pricing quotes, and next steps into a running Doc.
Summaries become follow-ups, landing page copy, and frequently asked questions for sales pages and customer service.
C) Voice notes to scripts
Use voice typing to draft your YouTube channel scripts and short ads. Talking makes copy conversational.
Then, apply a word replacer or Docs substitutions to align brand terms automatically.
D) Social and community
Reply to Instagram chats, FB Messenger, and forums using voice dictation (via Voice In or OS dictation) to keep pace without burning out your fingers.
Tip: Keep a dictation cleanup checklist. Scan for homophones, fix capitalization, run spellcheck, and read the post with text-to-speech to catch awkward bits.
Here’s a quick checklist you can refer back to or copy to your SOPs:
Mastering Google Docs voice typing is less about memorizing hundreds of voice commands and more about a tight setup, a few core commands, and a cleanup pass. Do that, and you’ll draft faster, reduce repetitive strain injuries, and ship more content.When you’re done, skip the copy-paste headaches and publish straight from Docs. Streamline your pipeline from Google Docs to WordPress with Wordable.io.